Before I get to the reason for my long absence I want to share two yummy recipes with you. The first is called Pavlova. It's an Australian dessert first introduced to me by my mom. If you've ever wondered what heaven tastes like, then try this recipe because I think it's as close as you can get. Did I mention it's the easiest recipe ever!
"Pavlova"
4 egg whites at room temperature
1/4 tsp Cream of Tarter
1 c Granulated Sugar
1 tsp Vanilla
Heat oven to 300 degrees
Line cookie sheet with dull side of aluminum foil facing up or with parchment paper.
Peat egg whites with cream of tarter until foamy and very gradually add sugar, small amounts at a time beating continuously.
Let beat on high for approx. 5-6 min. until peaks are very firm and then add vanilla.
Beat in vanilla and scoop mixture onto the prepared cookie sheet making a circle about 10 in. Place in oven and REDUCE heat to 250 and bake about 60 min. until firm and dry to the touch. Cool completely. Add filling and fruit.
Filling: 1 c. whipping cream whipped with NO sugar added. Top with assorted fruit. I like strawberries and kiwis.
You can use this recipe to make 30-40 small individual ones but reduce cooking time to 30-40 min. These small shell can store for a few days.
.
Since we were in the Aussie mood I made Aussie burgers to accompany our lovely dessert. The only difference between an american burger and an aussie burger is the fried egg, beets, pineapple slice, and bbq sauce. It's called "The Burger with Everything" and boy is it a mouthful as you can see. I know it sounds weird, but it really is good, so if you feel like trying something new try an Aussie burger
Now onto the real reason why I haven't blogged, "I've been Busy!" My friend and I did a craft show together and made a bunch of super cute dresses and bows and it was a blast, but I was seriously sewing 6 hours a day for the last 3 weeks. Unlike most tedious jobs, this was actually quite fun and enjoyable. These are a few pictures of everything we did. I think we'll try to do it again. I've also been working on curtains, painting, redecorating, and gardening. It's so much fun to be productive and have something to keep me busy because usually I'm just sitting around on my butt looking for something to do. I have a couple projects I'm working on that I can't wait to share with you, so I'll keep you "Posted".
Tuesday, May 25, 2010
Tuesday, April 6, 2010
Simply Adorable Little Easter Dress
This was my project while I listened to General Conference on Sunday and I think it turned out pretty dang cute. I kind of copied it from another dress I saw once, but seriously if you have any basic sewing skills you could probably figure this pattern out pretty easily. I'll try to draw out what exactly I did, but all you really need is a couple of yards of cute fabric and you have one Simply Adorable dress. I plan on making a few more because their so simple and cute.
Tuesday, March 23, 2010
Problem wall . . . . Solved!
So I have one of those really high walls in my living room that screams "Please decorate me" and I've finally come up with something. Over the past few months I've been collecting cheap frames and decorative plates and now that it's not freezing outside I was finally able to paint them with an nice glossy black paint and then all I did was arrange them to my taste and wallah. . . . . this was the final product. It was really simple, didn't cost a lot and takes up a lot of space. So if you ever need to decorate a big wall you have at least one idea.
Thursday, March 18, 2010
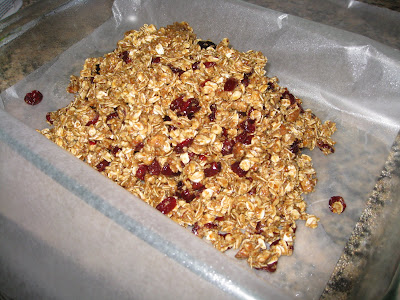
Granola Bars you'll love!
I've never been able to find a granola bar that truly satisfies my snack craving, until now. I discovered the only good granola bars around are homemade ones. I found this recipe and I've made it about four times already and when I run out, I'm in denial until I make some more.
Ingredients:
2 c. oats
3/4 c. wheat germ
3/4 c. sunflower seeds (or another kind of nut like almonds)
1 c. peanuts, crushed ( I like to use pecans instead)
2/3 c. brown sugar
1/2 c. honey
4 tbs. butter (I've gotten away with 3 or less)
2 tsp. vanilla extract
1/2 tsp. salt
about 8 oz. dried fruit (love crasins!)
Crush the peanuts or pecans and add them to the wheat germ and sunflower seeds, and oats and pour onto a cookie sheet and bake for 10-12 min at 400 degrees.
Meanwhile, prepare an 11x13'' pan with some wax paper sprayed with pam.
Then you can combine the brown sugar, honey, butter and vanilla in a small sauce pan and bring to simmer then set aside and wait for the oats to finish toasting.
Once everything is done cooking combine the oat mixture and the sugar mixture and stir until evenly distributed. This is where you can add the dried fruit if you want.
Now pour the mixture into you greased pan and fold the wax paper over and press down firmly so that it gets packed in there tight. You might want to peal the wax paper off afterwards so it doesn't stick, I've had issues with that.
Once the bars have completely cooled (about 3hrs) then you can cut them up and individually wrap them with ceran wrap.
Enjoy a healthy snack that will definitely satisfy those afternoon sweet cravings.
Tuesday, March 9, 2010
Simply Adorable Purse Tutorial
This is a pattern I made from a Target purse once and now I make it all the time because it's so easy and you can dress it up super cute.
Supplies:
-1/2 yd of lining and outside, 1yd in all. I used the same for both but I usually use two different fabrics.
-Sewing machine
-Scissors
-Cutting board (optional)
Cut out pattern from both fabrics. The strap is pretty simple to copy and the body of the purse is just a 12'' by 12'' square or however big you want it. Remember to cut two of each from both the lining and outside fabric so will have four of each piece. I also cut the body of the purse on the fold so all I have to do is sew down the sides and not worry about the bottom. If you do this then you will only have 2 body pieces all together instead of 4.
As mentioned above, just sew down the sides of both the lining and outside purse. I don't have a surger so I'll just do a quick zig zag down the seams to secure it.
To make the corner just flatten the bottom corner of each piece and sew about 2'' in strait across.
Step 4: The strap
Step 4: The strap
Take the small ends of both straps and attach to make one long strap. Do this to both sets so you have two identical straps.
Put both sets of straps together right sides facing in and sew along both sides then pull right-side out and press. I like to sew about 1/4'' in from the seam on the outside to make a more finished look.
This is the trick part. I'll try to explain it well. Take either the lining or the outside of the purse and flip it right-side out. then flatten it sideways so the side seams are together. Then center one side of the strap right over one of the side seams and pin. Sew across strap about 1/2'' in.
Now you're ready to attach the lining and outside sets together. With your strap still attached to one side of the purse, insert the lining or the outside, whichever you attached the strap to, into the other right side out. So you should have either the lining or the outside of the purse stuffed into the other right-sides facing each other. Now sew about 1/2'' seam all the way around the top of purse but leave an opening big enough to insert the other end of strap on the sides. I just mark the opening with 2 pins one on each side and then sew around from pin to pin.
Step 7:
Step 7:
Flip everything right-side out through little opening in top and stuff the lining into the body of the purse. Now all you have to do is attach the other end of the strap by inserting the raw end into that opening you left, fold in the seam and finish with a 1/4'' seam around top to finish. Yea! We're done!
The finished product.
You can add all kinds of simple embellishments on the outside to give your purse character and cuteness. I attached a bunch of little pocket flowers with a button in the center just to make it a little more girly.
The Best Cinnamon Rolls!
This recipe is my mom's, and I'm pretty sure it's the best out there. I don't think I've ever heard anyone say anything but yummy goodness about them.
Mitzi's Cinnamon Rolls:
Dissolve 2 TBS yeast in 3 C. warm water and add:
3/4 C. sugar
1/2 c. butter or marg.
2 beaten eggs
continue to add:
7 1/2 c. flour (about)
1 TBS salt
Knead to a soft, but not sticky dough and let rise.
Divide dough in half then roll into a 12" by 20" rectangle and spread on a mixture of :
1/2 c. butter or marg.
1 c. brown sugar
1 1/2 tsp. cinnamon (or more)
Roll up and cut into 1" slices and place on well greased cookie sheet.
Let rise until double in size and bake at 375 until golden brown.
Makes about 2 pans of cinnamon rolls.
Icing:
2+ TBS butter or marg
2 lbs. Powdered Sugar
Just enough milk to get the texture you like to spread or drizzle.
1/2 tsp. Vanilla
1/2 tsp. Almond extract
Monday, February 22, 2010
Project #2: Child's apron.
If you want the step by step instructions for this adorable apron check out Skip to my Lou. I just used some ruffle by the yard, but you can make your own ruffle to match. It seriously took me about an hour and it was very simple to put together. For the flower I made a simple layered felt flower and then sewed a button in the middle to tie it all together. If you have kids that love to dress up as much as my little girl, then they will love feeling like a real "Mommy" in the kitchen with this sweet little apron.
Tuesday, February 16, 2010
I'm so excited to share my first project on my new blog. My daughter is having a birthday soon and since I'm trying to save one the bucks I decided to do a homemade birthday. First, I'm making these super cute, and super easy Black Apple Dolls. So far I've only make 2 but I have 4 total that I'm designing. Click here for the pattern and How-to. You can get really creative with the design on the shirt, you could even make clothes to put on it. I'm also going to make a simple little apron to go with her little kitchen and lastly, I'll probably make her a simple little purse. I just made one for her friend and she was quite jealous and wanted one of her own. Hopefully you enjoy making these fun easy projects as much as I do.
Monday, February 15, 2010
Welcome!
Introducing . . . . (drum roll please) . . . "A Tiffany Epiphany" the craft/whatever blog you've been waiting for. Okay let's get serious now, I've wanted to start a craft/whatever blog for quite some time now, but I wanted the perfect name. The kind of name that sticks in your head when you hear it and brings personal enlightenment whenever you think about it. Well one night "light struck my brain" (Hook) and I had an epiphany of my own, a Tiffany Epiphany actually and so that's what I decided to name my blog.
My only hope and desire is to inspire others to be creative and have epiphanies of their own.
Now, I know that I'm not the only one with fun ideas to share, and I know that not everyone has time to keep up a blog, so I want to invite anyone to share an idea, recipe, or inspiration. Just let me know in the comment box that you have something to share and I'll send you my email so we can all enjoy your great idea.
Lets just have fun and get creative together.
Subscribe to:
Posts (Atom)