Tuesday, March 23, 2010
Problem wall . . . . Solved!
So I have one of those really high walls in my living room that screams "Please decorate me" and I've finally come up with something. Over the past few months I've been collecting cheap frames and decorative plates and now that it's not freezing outside I was finally able to paint them with an nice glossy black paint and then all I did was arrange them to my taste and wallah. . . . . this was the final product. It was really simple, didn't cost a lot and takes up a lot of space. So if you ever need to decorate a big wall you have at least one idea.
Thursday, March 18, 2010
Granola Bars you'll love!
I've never been able to find a granola bar that truly satisfies my snack craving, until now. I discovered the only good granola bars around are homemade ones. I found this recipe and I've made it about four times already and when I run out, I'm in denial until I make some more.
Ingredients:
2 c. oats
3/4 c. wheat germ
3/4 c. sunflower seeds (or another kind of nut like almonds)
1 c. peanuts, crushed ( I like to use pecans instead)
2/3 c. brown sugar
1/2 c. honey
4 tbs. butter (I've gotten away with 3 or less)
2 tsp. vanilla extract
1/2 tsp. salt
about 8 oz. dried fruit (love crasins!)
Crush the peanuts or pecans and add them to the wheat germ and sunflower seeds, and oats and pour onto a cookie sheet and bake for 10-12 min at 400 degrees.
Meanwhile, prepare an 11x13'' pan with some wax paper sprayed with pam.
Then you can combine the brown sugar, honey, butter and vanilla in a small sauce pan and bring to simmer then set aside and wait for the oats to finish toasting.
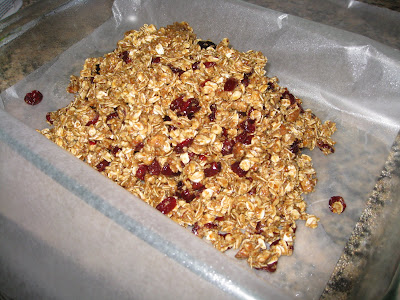
Once everything is done cooking combine the oat mixture and the sugar mixture and stir until evenly distributed. This is where you can add the dried fruit if you want.
Now pour the mixture into you greased pan and fold the wax paper over and press down firmly so that it gets packed in there tight. You might want to peal the wax paper off afterwards so it doesn't stick, I've had issues with that.
Once the bars have completely cooled (about 3hrs) then you can cut them up and individually wrap them with ceran wrap.
Enjoy a healthy snack that will definitely satisfy those afternoon sweet cravings.
Tuesday, March 9, 2010
Simply Adorable Purse Tutorial
This is a pattern I made from a Target purse once and now I make it all the time because it's so easy and you can dress it up super cute.
Supplies:
-1/2 yd of lining and outside, 1yd in all. I used the same for both but I usually use two different fabrics.
-Sewing machine
-Scissors
-Cutting board (optional)
Cut out pattern from both fabrics. The strap is pretty simple to copy and the body of the purse is just a 12'' by 12'' square or however big you want it. Remember to cut two of each from both the lining and outside fabric so will have four of each piece. I also cut the body of the purse on the fold so all I have to do is sew down the sides and not worry about the bottom. If you do this then you will only have 2 body pieces all together instead of 4.
As mentioned above, just sew down the sides of both the lining and outside purse. I don't have a surger so I'll just do a quick zig zag down the seams to secure it.
To make the corner just flatten the bottom corner of each piece and sew about 2'' in strait across.
Step 4: The strap
Step 4: The strap
Take the small ends of both straps and attach to make one long strap. Do this to both sets so you have two identical straps.
Put both sets of straps together right sides facing in and sew along both sides then pull right-side out and press. I like to sew about 1/4'' in from the seam on the outside to make a more finished look.
This is the trick part. I'll try to explain it well. Take either the lining or the outside of the purse and flip it right-side out. then flatten it sideways so the side seams are together. Then center one side of the strap right over one of the side seams and pin. Sew across strap about 1/2'' in.
Now you're ready to attach the lining and outside sets together. With your strap still attached to one side of the purse, insert the lining or the outside, whichever you attached the strap to, into the other right side out. So you should have either the lining or the outside of the purse stuffed into the other right-sides facing each other. Now sew about 1/2'' seam all the way around the top of purse but leave an opening big enough to insert the other end of strap on the sides. I just mark the opening with 2 pins one on each side and then sew around from pin to pin.
Step 7:
Step 7:
Flip everything right-side out through little opening in top and stuff the lining into the body of the purse. Now all you have to do is attach the other end of the strap by inserting the raw end into that opening you left, fold in the seam and finish with a 1/4'' seam around top to finish. Yea! We're done!
The finished product.
You can add all kinds of simple embellishments on the outside to give your purse character and cuteness. I attached a bunch of little pocket flowers with a button in the center just to make it a little more girly.
The Best Cinnamon Rolls!
This recipe is my mom's, and I'm pretty sure it's the best out there. I don't think I've ever heard anyone say anything but yummy goodness about them.
Mitzi's Cinnamon Rolls:
Dissolve 2 TBS yeast in 3 C. warm water and add:
3/4 C. sugar
1/2 c. butter or marg.
2 beaten eggs
continue to add:
7 1/2 c. flour (about)
1 TBS salt
Knead to a soft, but not sticky dough and let rise.
Divide dough in half then roll into a 12" by 20" rectangle and spread on a mixture of :
1/2 c. butter or marg.
1 c. brown sugar
1 1/2 tsp. cinnamon (or more)
Roll up and cut into 1" slices and place on well greased cookie sheet.
Let rise until double in size and bake at 375 until golden brown.
Makes about 2 pans of cinnamon rolls.
Icing:
2+ TBS butter or marg
2 lbs. Powdered Sugar
Just enough milk to get the texture you like to spread or drizzle.
1/2 tsp. Vanilla
1/2 tsp. Almond extract
Subscribe to:
Posts (Atom)